Showing posts with label Gadget. Show all posts

Create a Forum in your Blog

        When you get bored with commenting and replays, you may think about forums where your Readers can ask questions ad your reader can itself replye for others query,,but the limit of Blogger makes you so sad.
But i can help you to setup a good forum to you in your blog.
Remember No chatbox or shoutbox can't made a service like a forum.

If you want a ful featured forum with free cost, Google Groups lets you setup a forum as easily as you can setup a blog.

Gadgets can't save with blank title

   My Blogging  friends complained that they can't save without giving a title for Gadgets .Actually you can't save or re-edit your gadgets without giving title.

When you try to save , you would get a error message " Required field must not be Blank " .

I have got a trick for escape from this.

You just Add    in the place of Title and save.This give you a non-title gadget.


How to add related post widget


A days before i added a new gadget in this blog,you can see this at the bottom of this post which shows all related post.Today i just showing you how done this, this will help you in your blog.Just see this its quite simple.


  • Login to Blogger account.

  • Then go to Settings, EDIT HTML, and click on "Expand Widget templates" .


  • Go to  (   < head > ) and paste the code below as instruction in the below image .


  •  Copy the code below,


  • Now just paste the below code after the red colored data
    (data.post.body)


  • Code::


  • Save the Template.And check the result.!!

How To Backup Your "Widgets"


Some times,you would get new template and new widgets,But when you change the template,you will lose the widget.Back up will help you to solve this Problem.The following Steps help you to back up your widgets in your Blog.


  Back up widgets From Page Element

  • Login to blogger with your ID


  • Click Layout.


  • Click menu Page Elemet, you will see the page be like this ( just example):example for page element


  • At representative of above seen the article edit which I give red circle, You must click at Edit in each the page element, hence will emerge popup window figuring in the code have in input to that. Pay attention the picture below :


    example image for pop up window


  • Copy the code inside there, and paste to Notepad.


  • Repeat the step above at all the elements.


  • Finish.


There is the step how to back the data inside page element. This is the other way to backup your widgets. 

                            Back up widget through Template Source Code

I think this way is more quickly and efisian, you need a few time to do this. This is the steps : 

  1. Visit your blog .

  2. Click the menu View at the bar menu. See the picture below :


  3. this is the example for see the template source code


  4. After click the menu View, will be out the sub menu, then click Source[As shown in the above pic]

  5. if your browser is Internet Explorer, so there is automatically will out the notepad with your templatesource code. If your browser is Mozilla Firefox or Opera, so there is out the new page with your template source code For example, see the picture below :the example for source code at the notpad

  6. Save your template source code.

  7. Finish.


Paypal Donation Box to Blog

Hope you seen a Paypal Donation Box in some of the websites or Blogs,to donate some amount.Well many of us want put
this code on their own blog/site like those popular sites but they don't
know how to do it.. Well i am very glad to teach you in simple methods.

If
you don't have a paypal account, click here to sign
up one. Just follow the steps given.


  • Just
    copy the below code and change some values in red.


  • Change Blog/Website Title to your
    own Blog title example change to "The-Online-Quest".


  • And change Your paypal email
    to your own paypal email.


New Google Translate Flags Widget

I know many friends blogs got visitors from different countries.Even my website have got visitors from UK,India,USA,Germany etc.But sometimes the language problem might be trouble our visitors.Some of the bloggers write theor languages in their own national language.But the visitors from other countries shouldn't read out your blog.This might reduce your visitors.

Today i introduce a new Google Translate Flags Widget for blogger.When any one clicks on their beloved  flags,the contents of site changes to the national language of their country.I think this is very helpful to whole bloggers.


How To Add ??


  • Go to Dashboard,Layout

  • Click on Page elements page,

  • click Add A Gadget and choose HTML/JavaScript 


Leave the title empty or type any title for your widget, and in the content area paste the following code.


Alexa Widget on Blogger


Alexa Rank is a ranking system of your website which bases its ranking on the level of traffic each website receives from the number of people who visit a website with the Alexa toolbar installed.[Click here]


To add the Alexa page rank widget , 


alexa widget for blogger

alexa widget for blogger


+  


add url alexa widget

add url alexa widget


  • Copy Java Script Code for Adding Alexa Widget on your blog,


get codes for alexa widget

get codes for alexa widget


  • Paste on your Blog.

  • Now,Save it.


Now reload your page,and Keep Blogging. :)

Invite Viewers and Add Event Gadget


As the
Followers Gadget has been integrated with Google Friend Connect. So now onwards you can  add all the gadgets available in Google Friend Connect to your
blog very easily..


Event
Gadget
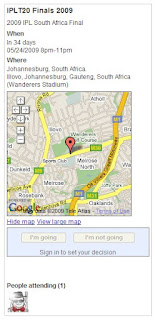
is one of them. It gives information to your readers about any event you decide. The description, time, location, map is included.
Viewers can join the event and see who else has joined the event. See
picture at left. Other gadgets like Members, Comment Wall and Social Bar
gadget can also be added.


:: Follow the Steps to add the event Gadget  ::


  •  Login at Blogger.com and check
    the Remember Me box while doing
    so.

  • Go to Google Friend Connect. You will see all your blogs
    listed in left sidebar under 'Sites'.

  • Click your Blog Title and it
    will expand to show submenu below it.

  • Click on 'Social gadgets' link

  • Click on 'Event Gadget' link.

  • Under Options select and
    choose the various options like Page, and fill in your Event's Title and
    Description. Choose the start and end dates and the Timezone. Fill in
    the Location, address and Media URL which is link of the picture or logo
    of your event.

  • Coose the gadget's size to fit your
    sidebar or you may have to increase
    blog width.

  •  Lastly click Generate Code button.

  • Copy the code given
    and paste
    in a HTML gadget in your blog.

  • Similarly you can
    add any of the other gadgets available like Members gadget and Comment
    Wall gadget. You can see these gadgets in action at top of third column
    in this blog. The social Bar gadget is at the top of the blog.


::  Thanks and Enjoy Blogging  ::

Gadget appears on specific page


We do not want the gadget to appear on every page. We want it to appear only on the 'Blog Members' page. For this we use the power of conditional tags. The first step is to get the permalink of the Blog Members post published in Step 1 above. Look in the Blog Archives gadget as the post was backdated. Click the post link to open the post page. Copy the link from the address bar. It looks like this in my example :


http://www.yoursitename.com/2009/12/specified-gadget.html

Then we have to modify the widget code. Login at Blogge.com and click Layouts link on dashboard. Then click Edit Html subtab of Layout tab. Click on Expand Widgets Template checkbox at top of Template Code box. Wait for page to refresh. Scroll down to the code for the Blog Members gadget. It will look like something this :


  • Put in the two lines in bold as shown above. In the first line :
<"http://www.yoursitename.com/2009/12/specified-gadget.html">
  • Put the permalink of your Blog Members post obtained in Step 1. Do not forget to put in the second line :


in exactly same place in the widget code. Save Template. As you can see the Members gadget showing all the present members appears only on this post.

Recent Posts in blog

Have you thought about about the recent posts shown in my side bar.

My friend hiouyt thought that , it is an html code , that i should manage it every day.

its quite funny to me more.


Actually it is a gadget provide by Blogger team itself.

To add this gadget ,


  • Sign in Blogger.com (Dashboard) 

  • Go to Layout 

  • Select Page elements 

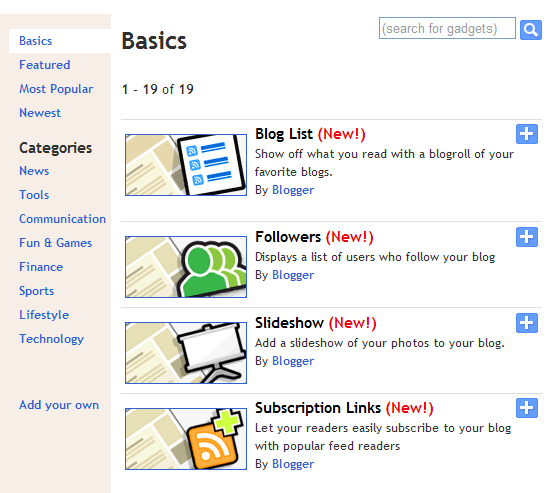
  • Click on " Add page elements  " (See Fig : 1.1)


 ( Fig: 1.1 )

  • A popup menu will be appear on the screen (Fig 1.2)


( Fig: 1.2 )


  • Select ' More Gadgets "  on the popup menu .


  • Click on "RECENT POSTS " .

  • Done !!


Now , Re-open your home page.

Woow.Enjoy

Have a nice day