Check the Steps that i have done below.
Free Blogger templates | Blog Tricks | Blogger tips| New Gadgets | Blogger Scripts | News
We Have Changed into
Showing posts with label tips. Show all posts
How to stop following a blog
Check the Steps that i have done below.
How many blogs can i create in blogger
Some peoples got crazy about creating new blogs and design it.But every one doubt about how many blog can create through Blogger.com . Actually you can create 100 Blogs per email account. If you need more blogs then you should create another Google account and create another 100 Blogs .
But how would you manage these blogs at a time ? Many friends of mine can't manage/update their few blogs itself.. So better you create One or Two ,maximum four blogs . Then only you can increase traffic and update well.If your website is out of date then it will reduce your daily traffic even you have good search result.
Once Visited user never come again to your blog if it is not updated.
If you have many blogs then add other Authors to your Blog then they can also update your Blog. This may keep your blog live.
But how would you manage these blogs at a time ? Many friends of mine can't manage/update their few blogs itself.. So better you create One or Two ,maximum four blogs . Then only you can increase traffic and update well.If your website is out of date then it will reduce your daily traffic even you have good search result.
Once Visited user never come again to your blog if it is not updated.
If you have many blogs then add other Authors to your Blog then they can also update your Blog. This may keep your blog live.
Blogger Dynamic views-Chrome Extentions
Blogger provides five different types of views in Google Chrome , which helps you to read all most posts in a view, so you not need of second page,and it reduce the Page Load.This Web Technology uses AJAX,HTML 5.0 , css 3.0 .
You can view in Flipcard,Sidebar,Mosaic,Snapshot,Timeslide dynamic views,.
- Click here and install this Extension.
- Now Open your Blog in Google Chrome and simply choose any views from the icon shown in Right side of Address bar of Browser.[image]
- Done.! You will be easily redireted to the view .
- Now Enjoy Different views of your Blog .
- Note : This Tip works in Google Chrome only. No other browser can reproduce it.
- Link : https://chrome.google.com/extensions/detail/mmoheajlpfaigefceljflpohdehkjbli
Remove Subscribe to:posts(Atom)
Do you feel " Subscribe to:posts(Atom) " is boring under your post ?
Now this post will show you how to remove it from your blog and it creates clean look for your blog.
Follow the Step :
- Go to dashboard/ template/ edit HTML.
- Click the 'Expand
Widgets Templates' box
- Find:
Remove this line:
That should remove Posts (Atom).
Creating Static pages in blogger
Recently, Blogger launched the much awaited Blogger Pages Feature.Static pages are a useful way of offering your readers information about your blog.This presents a Blogger to publish their blogs as “about”, “contact” and even “archive” pages.
So, lets see how to Create Static Pages in Blogger.


So, lets see how to Create Static Pages in Blogger.
- Sign into Blogger (draft.blogger.com)
- Click on New Post as usual.

- Select the Edit Pages from the top menu

- Click on 'New Page' button.

- Now, give your page a title and write the content and publish the page.
How To Remove Navbar In Blogger Blogs
In a blog hosted at blogger.com, you would always see a default navbar in the top of the blog page, and it has a search box, flag option etc.
There are a couple reasons why you would like to remove the navbar in your blogger blog -
1. The professionalism of the blog is not maintained. Really, the blog does not look good with the navbar.
2. Sometimes you do nothing wrong, but someone flags your blog through the option in navbar, so you are in risk.
So here is how to remove the navbar in blogger template -
Go to your blog settings > Layout > Edit HTML
Find this -
/* Variable definitions
====================
Above that, paste this -
#navbar-iframe { display: none !important; }
And save the setting. You are done and the navbar is gone! Pretty easy huh!
How to block follower on blogger
- Login to blogger.com and you are at the Dashboard
- Here, for every blog of you an see followers link if it has minimum one, as you can see in bellow image Technical Details blog has 8 Followers
- Click on Followers Link for the blog for which you want to block some follower
- It will show list of followers as shown in bellow image
- This will show updates and links of follower as well as link for blocking the follower
- Click on Block This User Link and follow the steps and the follower gets blocked from following your blog.
- If you don't want block the follower but add as a friend then click on Add as friend as shown in the above image
Solution for spam appeal
Is your blog is spam labelled , or is it not shown now a days ? .We found that many blogs are blocked as spams blog.Now blogger team are very strict in these area.Some of my friends seen that "Return to Blogger" error while they try to open their Blog.To solve this problem,
You should take a request to blogger Team.
Paste this to URL
Thanks
Type your own language
Now Google support most of common languages in your area, if you are where ever in this world.If you are an Indian.It support all major languages like Malayalam,hindi,tamil,marathi,punjabi.That means it help you to write in Malayalam more easily and post it in blog. ..
First of all you should make it ON.
For this ,Follow this Step.
It had seen most of the fonts are not supported by blogs.So it is better to use Google transliteration.Here you can write any language with most easily.i sure it will help you very much.
First of all you should make it ON.
For this ,Follow this Step.
It had seen most of the fonts are not supported by blogs.So it is better to use Google transliteration.Here you can write any language with most easily.i sure it will help you very much.
Visit here to write in any language http://www.google.com/transliterate/
Add a Free Chat Box Widget to Your Blogspot Blog
Here’s a screenshot of a Blogger blog with a chat box embedded in the main column:
These steps are easy enough for anyone, but if you have any trouble, you can contact Chatroll Support via live chat or email. Let’s get straight to it!
- Create a Chatroll live community to use for your chat box.
Go to Chatroll, enter your community’s name in the “Name Your Live Community…” box and click “Create”. Choose a name that fits with your blog, as this name will appear in the chat box title. Write an attractive and detailed description so that people can easily find your new Chatroll community (this will also help drive traffic to your blog). - Copy the chat window embed code from your live community’s home page.
In your new live community’s home page (the page that is shown after your community has been successfully created) copy the embed code from the text box labeled ‘embed’. This text box is located under the chat window, as shown below: - Edit your Layout in Blogger.
In Blogger, click on the “Layout” tab to show your blog’s layout: - Add a new HTML/Javascript gadget.
On your blog’s layout screen, click the “Add a Gadget” link to open the Add a Gadget window:
In the Add a Gadget window, scroll down and find the “HTML/Javascript” gadget. Click on the “+” icon to add it. - Paste the Chatroll embed code into the HTML/Javascript gadget.
On the new HTML/Javascript gadget screen, enter a title for the gadget. A good title should alert your readers that this is your site’s live chat. Here’s the important part: Paste the chat window embed code into the Content area (this is the code you copied from Chatroll in step 2):
Finally, click “Save”. The gadget should now be visible in your blog’s layout.
That’s it! You’ve just chat-enabled your Blogger or Blogspot blog! You can now use the Blogger Layout tab to drag the chat box widget wherever you want in your blog’s layout.
Here’s a few more tips for best results:
- Position the chat box so it appears on every page: For best results, place the chat box where it will appear on every page, so that your readers can continue their conversation even if they move from one page to another within your blog.
- Match the chat box colors and size to your blog’s template:To further maximize your chat widgets’s success, you’ll want to customize it to match your site design. Chatroll lets you customize the position, size, and color of the chat to fit in perfectly with your blog’s template. Each time you customize the chat, simply click “Edit” on the chat gadget in the Blogger Layout page and re-paste the embed code.
Thank you for reading, we hope this article has been useful for you.. Enjoy your new Chatroll chat box widget!
Add a Free Chat Box Widget to Your Blogspot Blog
Here’s a screenshot of a Blogger blog with a chat box embedded in the main column:
These steps are easy enough for anyone, but if you have any trouble, you can contact Chatroll Support via live chat or email. Let’s get straight to it!
- Create a Chatroll live community to use for your chat box.
Go to Chatroll, enter your community’s name in the “Name Your Live Community…” box and click “Create”. Choose a name that fits with your blog, as this name will appear in the chat box title. Write an attractive and detailed description so that people can easily find your new Chatroll community (this will also help drive traffic to your blog). - Copy the chat window embed code from your live community’s home page.
In your new live community’s home page (the page that is shown after your community has been successfully created) copy the embed code from the text box labeled ‘embed’. This text box is located under the chat window, as shown below: - Edit your Layout in Blogger.
In Blogger, click on the “Layout” tab to show your blog’s layout: - Add a new HTML/Javascript gadget.
On your blog’s layout screen, click the “Add a Gadget” link to open the Add a Gadget window:
In the Add a Gadget window, scroll down and find the “HTML/Javascript” gadget. Click on the “+” icon to add it. - Paste the Chatroll embed code into the HTML/Javascript gadget.
On the new HTML/Javascript gadget screen, enter a title for the gadget. A good title should alert your readers that this is your site’s live chat. Here’s the important part: Paste the chat window embed code into the Content area (this is the code you copied from Chatroll in step 2):
Finally, click “Save”. The gadget should now be visible in your blog’s layout.
That’s it! You’ve just chat-enabled your Blogger or Blogspot blog! You can now use the Blogger Layout tab to drag the chat box widget wherever you want in your blog’s layout.
Here’s a few more tips for best results:
- Position the chat box so it appears on every page: For best results, place the chat box where it will appear on every page, so that your readers can continue their conversation even if they move from one page to another within your blog.
- Match the chat box colors and size to your blog’s template:To further maximize your chat widgets’s success, you’ll want to customize it to match your site design. Chatroll lets you customize the position, size, and color of the chat to fit in perfectly with your blog’s template. Each time you customize the chat, simply click “Edit” on the chat gadget in the Blogger Layout page and re-paste the embed code.
Thank you for reading, we hope this article has been useful for you.. Enjoy your new Chatroll chat box widget!
create Read more link on my blog
I sure ,this post will surely help you to make your blog article more shorten.You can add "Read more "Link to your Blog home page.New Updated editor have this feature.They called this asAfter Jump.Lets look on to the feature of "AFTER THE JUMP '
After the Jump is a feature which lets you create expandable post summaries in your blog posts, so longer posts appear as an intro with a link toRead More
Creating jump breaks in your blog posts can be easily done right from the post editor, without the need for any HTML changes. First, decide where in the post you want to create the jump break, and place your cursor in that position:
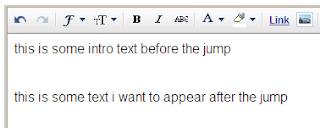
Once your mouse cursor is placed at the jump point, simply click the Insert Jump Break toolbar icon:
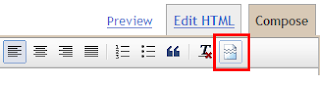
Clicking the icon will insert a grey bar at the cursor point, illustrating where in the post your break will appear. The bar can be dragged though, so you can always re-position it after insertion.
If you don't use the new post editor, you can still insert a jump break in Edit HTML mode by adding where you want to position the jump break.
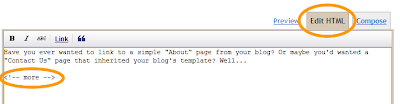
Once you are set on the jump break's location within the post, you are ready to publish your post. After publishing, you will notice that theRead More link is placed where you set the jump break:
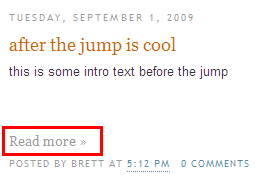
Clicking on the Read More link will then display the full text of the post:
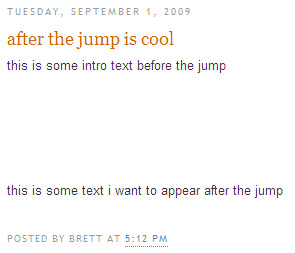
If you feel like changing the Read More text to your own custom phrase, you can easily do this from the Layout | Page Elements tab. ClickEdit on the Blog Post widget, and then change the Post page link text to whatever you'd like.
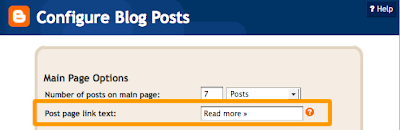
One more note, the Jump Break feature does not change how your post appears in your feed. You can configure post feed options by going to Settings | Basic | Site Feed, and editing Allow Blog Feeds.
Note:For those using a customized third-party template, you will have to add a snippet of code to make Jump Breaks work.
To do this, access your blog's Layout | Edit HTML tab, and first backup your template by clicking the Download Full Template link at the top of the page. This will download an XML version of your template which you can upload later at any time if you need to.
After backing up your template, then click the Expand Widget Templates checkbox, and scan your HTML for the following snippet:
Once you've located that code, paste the following snippet directly below it:
After the Jump is a feature which lets you create expandable post summaries in your blog posts, so longer posts appear as an intro with a link to
Creating jump breaks in your blog posts can be easily done right from the post editor, without the need for any HTML changes. First, decide where in the post you want to create the jump break, and place your cursor in that position:
Once your mouse cursor is placed at the jump point, simply click the Insert Jump Break toolbar icon:
Clicking the icon will insert a grey bar at the cursor point, illustrating where in the post your break will appear. The bar can be dragged though, so you can always re-position it after insertion.
If you don't use the new post editor, you can still insert a jump break in Edit HTML mode by adding where you want to position the jump break.

Once you are set on the jump break's location within the post, you are ready to publish your post. After publishing, you will notice that theRead More link is placed where you set the jump break:
Clicking on the Read More link will then display the full text of the post:
If you feel like changing the Read More text to your own custom phrase, you can easily do this from the Layout | Page Elements tab. ClickEdit on the Blog Post widget, and then change the Post page link text to whatever you'd like.

One more note, the Jump Break feature does not change how your post appears in your feed. You can configure post feed options by going to Settings | Basic | Site Feed, and editing Allow Blog Feeds.
Note:For those using a customized third-party template, you will have to add a snippet of code to make Jump Breaks work.
To do this, access your blog's Layout | Edit HTML tab, and first backup your template by clicking the Download Full Template link at the top of the page. This will download an XML version of your template which you can upload later at any time if you need to.
After backing up your template, then click the Expand Widget Templates checkbox, and scan your HTML for the following snippet:
<data:post.body/>Once you've located that code, paste the following snippet directly below it:
<b:if cond='data:post.hasJumpLink'>
<div class='jump-link'>
<a expr:href='data:post.url + "#more"'><data:post.jumpText/></a>
</div>
</b:if >create Read more link on my blog
I sure ,this post will surely help you to make your blog article more shorten.You can add "Read more "Link to your Blog home page.New Updated editor have this feature.They called this asAfter Jump.Lets look on to the feature of "AFTER THE JUMP '
After the Jump is a feature which lets you create expandable post summaries in your blog posts, so longer posts appear as an intro with a link toRead More
Creating jump breaks in your blog posts can be easily done right from the post editor, without the need for any HTML changes. First, decide where in the post you want to create the jump break, and place your cursor in that position:

Once your mouse cursor is placed at the jump point, simply click the Insert Jump Break toolbar icon:

Clicking the icon will insert a grey bar at the cursor point, illustrating where in the post your break will appear. The bar can be dragged though, so you can always re-position it after insertion.
If you don't use the new post editor, you can still insert a jump break in Edit HTML mode by adding where you want to position the jump break.

Once you are set on the jump break's location within the post, you are ready to publish your post. After publishing, you will notice that theRead More link is placed where you set the jump break:

Clicking on the Read More link will then display the full text of the post:

If you feel like changing the Read More text to your own custom phrase, you can easily do this from the Layout | Page Elements tab. ClickEdit on the Blog Post widget, and then change the Post page link text to whatever you'd like.

One more note, the Jump Break feature does not change how your post appears in your feed. You can configure post feed options by going to Settings | Basic | Site Feed, and editing Allow Blog Feeds.
Note:For those using a customized third-party template, you will have to add a snippet of code to make Jump Breaks work.
To do this, access your blog's Layout | Edit HTML tab, and first backup your template by clicking the Download Full Template link at the top of the page. This will download an XML version of your template which you can upload later at any time if you need to.
After backing up your template, then click the Expand Widget Templates checkbox, and scan your HTML for the following snippet:
Once you've located that code, paste the following snippet directly below it:
After the Jump is a feature which lets you create expandable post summaries in your blog posts, so longer posts appear as an intro with a link to
Creating jump breaks in your blog posts can be easily done right from the post editor, without the need for any HTML changes. First, decide where in the post you want to create the jump break, and place your cursor in that position:
Once your mouse cursor is placed at the jump point, simply click the Insert Jump Break toolbar icon:
Clicking the icon will insert a grey bar at the cursor point, illustrating where in the post your break will appear. The bar can be dragged though, so you can always re-position it after insertion.
If you don't use the new post editor, you can still insert a jump break in Edit HTML mode by adding where you want to position the jump break.

Once you are set on the jump break's location within the post, you are ready to publish your post. After publishing, you will notice that theRead More link is placed where you set the jump break:
Clicking on the Read More link will then display the full text of the post:
If you feel like changing the Read More text to your own custom phrase, you can easily do this from the Layout | Page Elements tab. ClickEdit on the Blog Post widget, and then change the Post page link text to whatever you'd like.

One more note, the Jump Break feature does not change how your post appears in your feed. You can configure post feed options by going to Settings | Basic | Site Feed, and editing Allow Blog Feeds.
Note:For those using a customized third-party template, you will have to add a snippet of code to make Jump Breaks work.
To do this, access your blog's Layout | Edit HTML tab, and first backup your template by clicking the Download Full Template link at the top of the page. This will download an XML version of your template which you can upload later at any time if you need to.
After backing up your template, then click the Expand Widget Templates checkbox, and scan your HTML for the following snippet:
<data:post.body/>Once you've located that code, paste the following snippet directly below it:
<b:if cond='data:post.hasJumpLink'>
<div class='jump-link'>
<a expr:href='data:post.url + "#more"'><data:post.jumpText/></a>
</div>
</b:if >Change url of my blog
One of my friend told me that he is bored with his current blog URL,and he want it to make a new one.
For that ,this post will surely help him and my readers .
To change the URL of your blog (Blogspot) ,follow the step :
For that ,this post will surely help him and my readers .
To change the URL of your blog (Blogspot) ,follow the step :
- Sign into your blog. Select the blog you you want to change the URL name.
- Select the Settings Tab.
- Under Settings select Publish
- Here is where you have 2 options to change your blog's URL. The first option is to enter a purchased domain name. A purchased domain name will remove the extension 'blogspot.com' and end with .com/or org . Currently Google offers to set you up with a domain name right on this page through a Google partner for $10.00. There is payment options all right there to get you set up..
- The second way to change your Blog's URL is to simply type in a new name in the text area provided. You will need to check for availability just as you did when you created your first blog's URL.
- Complete the word verification and save changes and you are all set.
Thanks
All your query are kindly requested to post on the Comment Box :)
Subscribe to:
Posts (Atom)

