Recover accidentally deleted post

Blogger offer an 'Undelete option' to delete a blog,what will do if your post has been deleted ? If you accidentally deleted a post, how can you try to recover (undelete) the deleted post? I have three different ideas, one of them depends on the cooperation of a helper plus a good memory or clever guesswork.


METHOD 1


       This method is applicable if you are still working on the same computer where you had prepared the post (or had viewed the deleted post). Just press ctrl+H (Cmd+H on MAC OS) to open a sidebar listing the browser history. Go to the part where you were editing the post and continue to edit or publish the post (or copy-paste from the cached copy of the displayed post):


browser history in sidebar


Alternative keyboard shortcut to call up the browser is shift+ctrl+H (shift+Cmd+H for MAC OS).


METHOD 2


This method is applicable if you had not closed the tab or window where you had been preparing the deleted post (or had viewed the deleted post). Just keep pressing the BACK button till you get back to the point where you were editing the post (or had viewed the post).


METHOD 3


Try to find a cached copy of the deleted post on the Web and restore the post from the cached copy. Type in


cache:URL


to try to find cached copies on the net.


METHOD 4


        This is applicable even if you have no access to the computer where you had edited or viewed the deleted post, but you must have the URL (permalink) of the deleted post. If you don't have the URL, then you can try to guess the URL from the post title.


For example, the title of this post is "Recover accidentally deleted post". Now I haven't published the post yet, but I can guess that this post URL will be:


http://www.blogxool.blogspot.com/recover-accidentally-deleted-post


If you have or can guess the deleted post URL and you want to try to undelete the deleted post, leave the URL in a comment and I will try to help.


Hope you enjoyed my post.

Thanks

Please comment on this :)

Add a fevicon for your Blog

Now remove blogger fevicon and add your style fevion for your Blog.
It makes a real nice touch for your Blog.
Example for Fevicon. Now you too can Create  a Fevicon for your blog,by removing the current blogger fevicon.


Favicon in IE address bar

How to add ?

      Simply upload the file, favicon.ico to the blog or other free uploading websites and get the Link. Make sure your favicon file is named “favicon.ico.” When someone bookmarks your site with a browser that supports favicons, your favicon will appear. Alternatively, you can use this code between the <head></head> (x)HTML tags:
<link rel=”shortcut icon” href=”http://www.thenameofyoursitehere.com/favicon.ico” mce_href=”http://www.thenameofyoursitehere.com/favicon.ico”/>


Some browsers will look for a direct link in the HTML source code to your site's favicon.ico file. You can help these browsers by adding this link in the head section of each page on which you want the Favicon.ico to appear.
Here is the link code to include: <link rel="Shortcut Icon" href="/favicon.ico">
Once you've added this code, upload all of your modified pages.

(Some people suggest that the following is actually more correct: <link rel="icon" href="/favicon.ico" type="image/x-icon"> You can use both if you want!)

If you want to use a GIF or PNG instead, use this format instead (just remember that it won’t work in IE):

<link rel="icon" href="/favicon.png" type="image/png"> or
<link rel="icon" href="/favicon.gif" type="image/gif"> 


Thanks
Enjoy with fevicon

Type your own language

Now Google support most of common languages in your area, if you are where ever in this world.If you are an Indian.It support all major languages like Malayalam,hindi,tamil,marathi,punjabi.That means it help you to write in Malayalam more easily and post it in blog. ..
First of all you should make it ON.
For this ,Follow this Step.

  • Go to Dashboard ,Select settings (Basic).
  • Now enable "Enable Transliteration ? "
  • Done !!
It had seen most of the fonts are not supported by blogs.So it is better to use Google transliteration.Here you can write any language with most easily.i sure it will help you very much.
Visit here to write in any language http://www.google.com/transliterate/

Thanks


Add a Free Chat Box Widget to Your Blogspot Blog


Here’s the easiest way to add a free Blogger chat box widget (also known as shoutbox, chatterbox, or chat room) to your Blogspot blog. Adding a chat box widget to your blog is an easy way to build community on your site and keep your visitors coming back. It’s so easy we can do it in less than a minute. We’ll use Chatroll live communities to create a chat box widget, customize it, and add it to your Blogger layout.
Here’s a screenshot of a Blogger blog with a chat box embedded in the main column:


These steps are easy enough for anyone, but if you have any trouble, you can contact Chatroll Support via live chat or email. Let’s get straight to it!
  1. Create a Chatroll live community to use for your chat box.
    Go to Chatroll, enter your community’s name in the “Name Your Live Community…” box and click “Create”. Choose a name that fits with your blog, as this name will appear in the chat box title. Write an attractive and detailed description so that people can easily find your new Chatroll community (this will also help drive traffic to your blog).
  2. Copy the chat window embed code from your live community’s home page.
    In your new live community’s home page (the page that is shown after your community has been successfully created) copy the embed code from the text box labeled ‘embed’. This text box is located under the chat window, as shown below:
  3. Edit your Layout in Blogger.
    In Blogger, click on the “Layout” tab to show your blog’s layout:
  4. Add a new HTML/Javascript gadget.
    On your blog’s layout screen, click the “Add a Gadget” link to open the Add a Gadget window:

    In the Add a Gadget window, scroll down and find the “HTML/Javascript” gadget. Click on the “+” icon to add it.
  5. Paste the Chatroll embed code into the HTML/Javascript gadget.
    On the new HTML/Javascript gadget screen, enter a title for the gadget. A good title should alert your readers that this is your site’s live chat. Here’s the important part: Paste the chat window embed code into the Content area (this is the code you copied from Chatroll in step 2):

    Finally, click “Save”. The gadget should now be visible in your blog’s layout.
That’s it! You’ve just chat-enabled your Blogger or Blogspot blog! You can now use the Blogger Layout tab to drag the chat box widget wherever you want in your blog’s layout.
Here’s a few more tips for best results:
  • Position the chat box so it appears on every page: For best results, place the chat box where it will appear on every page, so that your readers can continue their conversation even if they move from one page to another within your blog.
  • Match the chat box colors and size to your blog’s template:To further maximize your chat widgets’s success, you’ll want to customize it to match your site design. Chatroll lets you customize the position, size, and color of the chat to fit in perfectly with your blog’s template. Each time you customize the chat, simply click “Edit” on the chat gadget in the Blogger Layout page and re-paste the embed code.
Thank you for reading, we hope this article has been useful for you.. Enjoy your new Chatroll chat box widget!

Add a Free Chat Box Widget to Your Blogspot Blog


Here’s the easiest way to add a free Blogger chat box widget (also known as shoutbox, chatterbox, or chat room) to your Blogspot blog. Adding a chat box widget to your blog is an easy way to build community on your site and keep your visitors coming back. It’s so easy we can do it in less than a minute. We’ll use Chatroll live communities to create a chat box widget, customize it, and add it to your Blogger layout.
Here’s a screenshot of a Blogger blog with a chat box embedded in the main column:


These steps are easy enough for anyone, but if you have any trouble, you can contact Chatroll Support via live chat or email. Let’s get straight to it!
  1. Create a Chatroll live community to use for your chat box.
    Go to Chatroll, enter your community’s name in the “Name Your Live Community…” box and click “Create”. Choose a name that fits with your blog, as this name will appear in the chat box title. Write an attractive and detailed description so that people can easily find your new Chatroll community (this will also help drive traffic to your blog).
  2. Copy the chat window embed code from your live community’s home page.
    In your new live community’s home page (the page that is shown after your community has been successfully created) copy the embed code from the text box labeled ‘embed’. This text box is located under the chat window, as shown below:
  3. Edit your Layout in Blogger.
    In Blogger, click on the “Layout” tab to show your blog’s layout:
  4. Add a new HTML/Javascript gadget.
    On your blog’s layout screen, click the “Add a Gadget” link to open the Add a Gadget window:

    In the Add a Gadget window, scroll down and find the “HTML/Javascript” gadget. Click on the “+” icon to add it.
  5. Paste the Chatroll embed code into the HTML/Javascript gadget.
    On the new HTML/Javascript gadget screen, enter a title for the gadget. A good title should alert your readers that this is your site’s live chat. Here’s the important part: Paste the chat window embed code into the Content area (this is the code you copied from Chatroll in step 2):

    Finally, click “Save”. The gadget should now be visible in your blog’s layout.
That’s it! You’ve just chat-enabled your Blogger or Blogspot blog! You can now use the Blogger Layout tab to drag the chat box widget wherever you want in your blog’s layout.
Here’s a few more tips for best results:
  • Position the chat box so it appears on every page: For best results, place the chat box where it will appear on every page, so that your readers can continue their conversation even if they move from one page to another within your blog.
  • Match the chat box colors and size to your blog’s template:To further maximize your chat widgets’s success, you’ll want to customize it to match your site design. Chatroll lets you customize the position, size, and color of the chat to fit in perfectly with your blog’s template. Each time you customize the chat, simply click “Edit” on the chat gadget in the Blogger Layout page and re-paste the embed code.
Thank you for reading, we hope this article has been useful for you.. Enjoy your new Chatroll chat box widget!

create Read more link on my blog


I sure ,this post will surely help you to make your blog article more shorten.You can add "Read more "Link to your Blog home page.New Updated editor have this feature.They called this asAfter Jump.Lets look on to the feature of "AFTER THE JUMP '

         After the Jump is a feature which lets you create expandable post summaries in your blog posts, so longer posts appear as an intro with a link to Read More
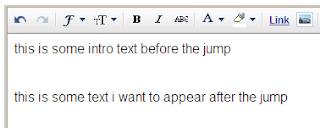
Creating jump breaks in your blog posts can be easily done right from the post editor, without the need for any HTML changes. First, decide where in the post you want to create the jump break, and place your cursor in that position:


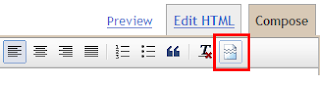
Once your mouse cursor is placed at the jump point, simply click the Insert Jump Break toolbar icon:


Clicking the icon will insert a grey bar at the cursor point, illustrating where in the post your break will appear. The bar can be dragged though, so you can always re-position it after insertion.

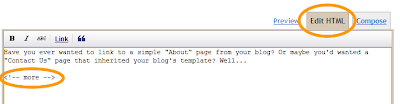
If you don't use the new post editor, you can still insert a jump break in Edit HTML mode by adding where you want to position the jump break.


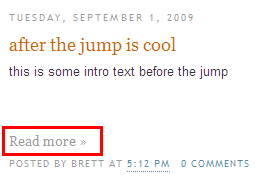
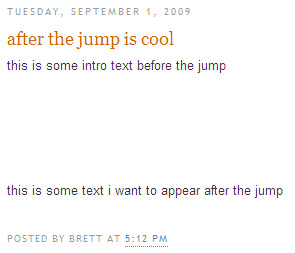
Once you are set on the jump break's location within the post, you are ready to publish your post. After publishing, you will notice that theRead More link is placed where you set the jump break:


Clicking on the Read More link will then display the full text of the post:


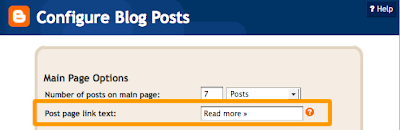
If you feel like changing the Read More text to your own custom phrase, you can easily do this from the Layout | Page Elements tab. ClickEdit on the Blog Post widget, and then change the Post page link text to whatever you'd like.


One more note, the Jump Break feature does not change how your post appears in your feed. You can configure post feed options by going to Settings | Basic | Site Feed, and editing Allow Blog Feeds.

Note:For those using a customized third-party template, you will have to add a snippet of code to make Jump Breaks work.
To do this, access your blog's Layout | Edit HTML tab, and first backup your template by clicking the Download Full Template link at the top of the page. This will download an XML version of your template which you can upload later at any time if you need to.
After backing up your template, then click the Expand Widget Templates checkbox, and scan your HTML for the following snippet:

<data:post.body/>
Once you've located that code, paste the following snippet directly below it:

<b:if cond='data:post.hasJumpLink'>
<div class='jump-link'>
<a expr:href='data:post.url + "#more"'><data:post.jumpText/></a>
</div>
</b:if >

create Read more link on my blog


I sure ,this post will surely help you to make your blog article more shorten.You can add "Read more "Link to your Blog home page.New Updated editor have this feature.They called this asAfter Jump.Lets look on to the feature of "AFTER THE JUMP '

         After the Jump is a feature which lets you create expandable post summaries in your blog posts, so longer posts appear as an intro with a link to Read More
Creating jump breaks in your blog posts can be easily done right from the post editor, without the need for any HTML changes. First, decide where in the post you want to create the jump break, and place your cursor in that position:


Once your mouse cursor is placed at the jump point, simply click the Insert Jump Break toolbar icon:


Clicking the icon will insert a grey bar at the cursor point, illustrating where in the post your break will appear. The bar can be dragged though, so you can always re-position it after insertion.

If you don't use the new post editor, you can still insert a jump break in Edit HTML mode by adding where you want to position the jump break.


Once you are set on the jump break's location within the post, you are ready to publish your post. After publishing, you will notice that theRead More link is placed where you set the jump break:


Clicking on the Read More link will then display the full text of the post:


If you feel like changing the Read More text to your own custom phrase, you can easily do this from the Layout | Page Elements tab. ClickEdit on the Blog Post widget, and then change the Post page link text to whatever you'd like.


One more note, the Jump Break feature does not change how your post appears in your feed. You can configure post feed options by going to Settings | Basic | Site Feed, and editing Allow Blog Feeds.

Note:For those using a customized third-party template, you will have to add a snippet of code to make Jump Breaks work.
To do this, access your blog's Layout | Edit HTML tab, and first backup your template by clicking the Download Full Template link at the top of the page. This will download an XML version of your template which you can upload later at any time if you need to.
After backing up your template, then click the Expand Widget Templates checkbox, and scan your HTML for the following snippet:

<data:post.body/>
Once you've located that code, paste the following snippet directly below it:

<b:if cond='data:post.hasJumpLink'>
<div class='jump-link'>
<a expr:href='data:post.url + "#more"'><data:post.jumpText/></a>
</div>
</b:if >

Change url of my blog

Last day, One of my friend told me that he is bored with his current blog URL,and he want it to make a new one.Bit a impressing one,

For that ,this post will surely help him and my readers .

To change the URL of your blog (Blogspot) ,follow the step :

  • Sign into your blog. Select the blog you you want to change the URL name. 

  • Select the Settings Tab

  • Under Settings select Publish


  • Here is where you have 2 options to change your blog's URL. The first option is to enter a purchased domain name. A purchased domain name will remove the extension 'blogspot.com' and end with .com/or org . Currently Google offers to set you up with a domain name right on this page through a Google partner for $10.00. There is payment options all right there to get you set up..


    • The second way to change your Blog's URL is to simply type in a new name in the text area provided. You will need to check for availability just as you did when you created your first blog's URL.

    • Complete the word verification and save changes and you are all set. 

     Note :   Keep in mind that if you change your URL any links related to your previous URL will not be saved to your new blog URL.
    Thanks


    Change url of my blog

    One of my friend told me that he is bored with his current blog URL,and he want it to make a new one.
    For that ,this post will surely help him and my readers .
    To change the URL of your blog (Blogspot) ,follow the step :
    • Sign into your blog. Select the blog you you want to change the URL name. 
    • Select the Settings Tab
    • Under Settings select Publish


    • Here is where you have 2 options to change your blog's URL. The first option is to enter a purchased domain name. A purchased domain name will remove the extension 'blogspot.com' and end with .com/or org . Currently Google offers to set you up with a domain name right on this page through a Google partner for $10.00. There is payment options all right there to get you set up..

      • The second way to change your Blog's URL is to simply type in a new name in the text area provided. You will need to check for availability just as you did when you created your first blog's URL.
      • Complete the word verification and save changes and you are all set. 
       Note :   Keep in mind that if you change your URL any links related to your previous URL will not be saved to your new blog URL.


      Thanks
      All your query  are kindly requested to post on the Comment Box :)


      Create Horizontal menubar


      Look to my horizontal menu bar.Most of the blogger will be like it to add them at their Blog.For this reason i am publishing the code here.
      You need just copy the code and paste it "html/script" Gadget on Page elements.


      <style type="text/css"> 
      /*Credits: Blogxool.blogspot.com */ 
      /*URL: http://www.blogxool.blogspot.com */ 
      .underlinemenu{ font-weight: bold; width: 100%; 
      }  
      .underlinemenu ul{ padding: 6px 0 7px 0;
      /*6px should equal top padding of "ul li a" below, 7px should equal bottom padding + bottom border of "ul li a" below*/ margin: 0; text-align: right; //set value to "left", "center", or "right"*/ } .underlinemenu ul li{ display: inline; } .underlinemenu ul li a{ color: #494949; padding: 6px 3px 4px 3px; /*top padding is 6px, bottom padding is 4px*/ margin-right: 20px; /*spacing between each menu link*/ text-decoration: none; border-bottom: 3px solid gray; /*bottom border is 3px*/ } .underlinemenu ul li a:hover, .underlinemenu ul li a.selected{ border-bottom-color: black; } </style> <div class="underlinemenu"> <ul> <li><a href="http://www.blogxool.blogspot.com/">Home</a></li> <li><a href="http://blogxool.blogspot.com/2009/09/free-blog-templates.html">Free Blog templates</a></li> <li><a href="http://www.blogxool.blogspot.com/">Bx-code errors</a></li> <li><a href="http://blogxool.blogspot.com/2009/10/tricks.html">Tricks and Hack</a></li> <li><a href="http://blogxool.blogspot.com/2009/10/scripts.html">Script n Code</a></li> <li><a href="http://www.blogxool.blogspot.com/">About Us</a></li> </ul> </div>

      Done!!
      Thanks
      Please show comments :)

      Create Horizontal menubar


      Look to my horizontal menu bar.Most of the blogger will be like it to add them at their Blog.For this reason i am publishing the code here.
      You need just copy the code and paste it "html/script" Gadget on Page elements.


      <style type="text/css"> 
      /*Credits: Blogxool.blogspot.com */ 
      /*URL: http://www.blogxool.blogspot.com */ 
      .underlinemenu{ font-weight: bold; width: 100%; 
      }  
      .underlinemenu ul{ padding: 6px 0 7px 0;
      /*6px should equal top padding of "ul li a" below, 7px should equal bottom padding + bottom border of "ul li a" below*/ margin: 0; text-align: right; //set value to "left", "center", or "right"*/ } .underlinemenu ul li{ display: inline; } .underlinemenu ul li a{ color: #494949; padding: 6px 3px 4px 3px; /*top padding is 6px, bottom padding is 4px*/ margin-right: 20px; /*spacing between each menu link*/ text-decoration: none; border-bottom: 3px solid gray; /*bottom border is 3px*/ } .underlinemenu ul li a:hover, .underlinemenu ul li a.selected{ border-bottom-color: black; } </style> <div class="underlinemenu"> <ul> <li><a href="http://www.blogxool.blogspot.com/">Home</a></li> <li><a href="http://blogxool.blogspot.com/2009/09/free-blog-templates.html">Free Blog templates</a></li> <li><a href="http://www.blogxool.blogspot.com/">Bx-code errors</a></li> <li><a href="http://blogxool.blogspot.com/2009/10/tricks.html">Tricks and Hack</a></li> <li><a href="http://blogxool.blogspot.com/2009/10/scripts.html">Script n Code</a></li> <li><a href="http://www.blogxool.blogspot.com/">About Us</a></li> </ul> </div>

      Done!!
      Thanks
      Please show comments :)

      Receive voice messages via Your Blog


            Crazy with voice messaged!! ? You can receive voice messages from your blog readers by placing a GrandCentral WebCall button directly on your blog.
      When people click the button, GrandCentral will call them and connect the call to your GrandCentral number. You can configure your settings to send your calls directly to your phone, or straight to voicemail. You can also post the voice messages you get directly on your blog.
      To set up a GrandCentral WebCall button, first you'll need to create a free GrandCentral account.
      Once you've signed up for GrandCentral, just follow these steps:
      1. Log in to GrandCentral and go to the Settings tab.
      2. Click the WebCall Button link.
      3. Click Select next to your favorite button.
      4. Click the Post link below your button. Copy the code provided, you'll need to add it to your blog's template later. Be sure to use one of the smaller buttons, as larger buttons might not fit in your blog's sidebar.
      5. Sign in to Blogger and go to the Templates tab.
      6. Click Add a Page Element and select 'HTML/Javascript' as the type.
      7. Paste the code provided by GrandCentral and click Save Changes.
      Your WebCall button is now set up. You can customize specific settings, greetings, and different RingShares by logging in to your GrandCentral account.


      Thanks

      Put a link to your Text

               With new Updater editor,we can make a link a text or picture where we like.
      It is very easy now,don't bother about html/script codes.Now every , One level blogger can do it by following my below steps. :


      • Select text area you want to make link
                  You should make up into 'compose" mode and should have update editor.
      • Now straightly go to the update editor .Click on "LINK"
      • Now a Popup window will be open there.
                   Type the web address you want to  link.


      • Now click on OK.
      • You done it.


      Thanks
      Keep in Touch

      Visitor Count - Google Analytics


      Most of us will be very much anxiety for our Visitors.Last years i was used hit counters and Online users Counters.It was very much Up to date .But Google came with a new technology that let you to know 
      1. From which site did he/she came
      2. From which country
      3. How much time he spend on your Blog
      4. Which all pages did he gone
      5. Visitors counter with most accurate .

      Way back, I had briefly played with Google Analytics but found the amount of information a little bit overwhelming and thought I don't need all that much information and I don't have that much time to check the statistics anyway.

      That is, until recently. What prompted me to have a second look at Google Analytics was that link in my Google AdSense report "Integrate your AdSense with Google Analytics" (or something like that, from memory because after integrating, the link now says "Go to your Google Analytics Account".

      When I had the time, I did dig deeper into the Google Analytics statistics and found many reasons why you should check it out too.

      One of the statistics from Statcounter is the screen resolutions of visitors which when I started blogging, showed that a substantial percentage of visitor still used the small 800x600 resolution. Because of that, I had stuck to Ramani's 3 column fixed width Minima template which fits nicely into the whole width of a 800x600 screen.

      As time went by, the visitor statistics showed that visitors with 800x600 screen resolution have become a small minority which made me switch to a wider 4 column Minima template which width fits nicely into a 1024x768 screen. However, one thing in the Statcounter screen resolution troubled me, the relatively large number with screen UNKNOWN.

      Statcounter visitor screen resolution statistics

      Google Analytics too have statistics for visitors screen resolution, but I discovered, much more detailed. As you can see in the screen shot above, Statcounter only gives 6 screen resolutions, one of them being UNKNOWN. Compare it with the screen shot below for Google Analytics. Google Analytics gives 10 screen resolutions, and there is no UNKNOWN. So Google Analytics have given me some assurance that the percentage of the 800x600 small screen is really small. I no longer have the worry that the among the large number of UNKNOWN in Statcounter statistics were hidden more small screens.

      Google Analytics visitor screen resolution statistics

      Another interesting statistics from Google Analytics is the Site Overlay. You can view which links have been clicked and the percentage. I have the label list in the first right sidebar, but I was doubtful if visitors ever click on them to find more information. Google Analytics Site Overlay shows this information as you can see from the screen shot below:


      It is a nice feeling to know one's label list is being used. The site overlay will also show which links main page (home page) in the post have been clicked (actually it is the pageview) as you can see from the screen shot below:


      However there are a number of things that Google Analytics Site Overlay does not track and one of them are Javascript. So if you are an AdSense publisher expecting to see which of your ads are being clicked, I am afraid you will be disappointed as AdSense uses Javascript.

      There is some concern that Google Analytics may slow down site downtime. I think this is a small concern if you paste Google Analytics codes just before the </body> tag which will be practically at the bottom of the template and will be the last to load.

      Know your online visitors

           Some times we have an anxiety to know about our visitors, and more anxiety to where are they from.Now say bye for you anxiety ,http://whos.amung.us/ helps to know more about your visitors.By using this site you can see where from your visitors , with map,graph and more features. 


      Step :

      • Copy the Code from http://whos.amung.us/

      • Paste it into your blog.(Html/Script Gadget)

      • Now you would get a gadget showing your online visitors.

      • Now click on it know more about visitors 

                   You can see graph of the week,day and map of your visitors and status etc...Enjoy with your online visitors.By analyzing these graphs and map , you can be analyses and do more traffic.

      •  Hide this Image from Users.

      And you can hide this online visitors option from your users .The below code hide the Online users image and replace it with Link "Online Visitors" .


      <a href='http://whos.amung.us/stats/you code/'><img border='0' height='0'  
      src='http://whos.amung.us/cwidget/code/code.png' title='Blogknol' width='0'/></a>
      &#169;2010 Gorkuts.com All rights. <a href='http://whos.amung.us/stats/code/'>
      Online VIsitors</a>

      Tweet your Post


               What about tweet your posts in blog.Now blogger feeds makes this opportunity for Bloggers.Now you can automatically update your twitter account with latest updates of your blog.For this Follow the Followed Methods..

      • Create a account in http://twitterfeed.com/ with OpenID .
      • Type your Blogger URL address.
      • After Registration you will be taken to new  Page where you can start linking blog feeds to your Twitter account.
      • Click the 'Connect your feed to Twitter Account' button
                              Which will prompt you to enter your Twitter login credentials to authorize Twitterfeed's access. You will get a nice little confirmation once you've successfully linked up your Twitter Account.


      • Enter a name for your feed. 
                    If you want to customize your feed's settings you can modify frequency, add prefixes, and even create keyword filters. 
      • click the Create Feed button. 
      • Done!! Twitterfeed is enabled.