Suppose, i have two blogs with not bad amount of visitors ,But i can't manage them, so i would like to make it out one.So i need a redirection purpose.That means if any one enter into my old blog, he will automatically redirect into my new blog :) how is it ?
So, how to do this?
If you are using a NEW BLOGGER TEMPLATE, do this:-
1. Go to blogger dashboard.
2.Click on the layout link> Edit html
3.Copy the below html code and Paste it anywhere between the head tags.[look at the below screenshot]
Don't forget to replace the newblogaddress in the code with your destination url(address)
4.SAVE THE CHANGES.
If you are user of CLASSIC BLOGGER TEMPLATE,Just follow this:-
1. Go to blogger dashboard
2. Click on the template link next to your blog name.
3. Copy the below code and paste it below the head tag as shown in the below screenshot
Don't forget to replace the newblogaddress in the code with your destination url(address)
We're kicking off our video series with a quick tutorial on how to add your blog's feed to your Facebook profile. That way, every time you publish a new blog post, Facebook imports it as a Note and notifies your Facebook friends. Hosted by me (Andy) your in-residence TypePad scientist:
If you are far from computer and your blog, don't be worry, Take your mobile phone and have blogging,with most easy and safety method.
Blogger introduce Mail-to-Blogger Feature.
To post your blog,you need to configure your Mail-to-Blogger email address.Then onwards you can have blogging on your Mobile itself.
The Mail-to-Blogger feature turns any email account into a blog-posting application.
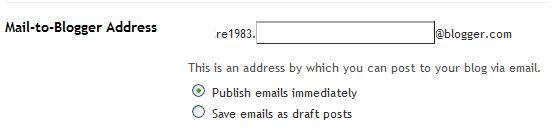
In Settings | Email you can create a Mail-to-Blogger address which you will use to send posts via email to your blog:
To post to your blog via email, you need to configure your Mail-to-Blogger email address in Settings | Email:
The format of the email address is username.secretword@blogger.com. Note that this email address must be kept secret. Otherwise, anyone who gets it will be able to post as you.
Also be sure to specify whether or not you prefer your email posts to publish automatically. If this option is not checked, then your posts will be saved on your account but will not appear on your blog until you log in to Blogger.com and publish them yourself.
Once you have saved your Settings, you can send email to your blog. The subjects of your email letters will be the titles of your posts, and the body of the emails will be the posts themselves. To include an image in your post, you can attach an image to you your email.
Notes: Sometimes email programs append text to the bottom of each sent message; to make sure this cruft doesn't get posted to your blog, put #end at the end of your post.
Upload your image to a photo hosting website likePhoto Bucket.com. With Photobucket, you can upload photos as well as videos, and you can blog direct from Photobucket.
First of all You should create an account in photo bucket.After you have uploaded your photo to Photobucket, you can use the <img src="photo URL" width="W"> tag to publish your photo to the blog, where W is the width of the photo you want displayed in your blog, or you can blog direct from Photobucket. If you take the first alternative, you will need the URL of the hosted photo. This you can get from your Photobucket account. See screenshot
Now its very easy to upload pictures to your blog .Better use new updated Editor for more functions.
Yopu can upload picture with three touch !!.Yes.
You can now upload photos to your blog(s) using Blogger Images;
just click the image icon in the post editor's toolbar.
When you click this icon, you'll get a window that allows you to select an image or multiple images from your computer.
Click the Browse button to locate the ones you want. Alternatively, you can enter the URL of an image that's already online and insert it into your post.
If you click the link to choose a layout, you can customize the way your images will appear in your post:
The left, center and right options determine how the text of your post flows around the pictures.
The size option lets you scale the pictures to different sizes within this posting area. Note that the picture will still be uploaded in its full size; this option just determines how it's scaled within the content of your post.
Label helps you to categories all your posts.It makes your visitors to catch the topic very easily,when they are enough posts.
Add Label to your Post :
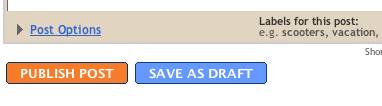
When you're writing a post, you'll have a space at the bottom of the form marked "Labels for this post."
Enter whatever labels you like, separating them with commas. You can also click the "show all" link to display a list of labels you've used previously.
Then just click on the labels to add them.
When you publish your post, the labels will be listed with it.
Clicking any of the labels will take you to a page containing only posts with that label.
Advanced Use
You can easily change the formatting used here by editing your blog's layout. You can also add a list of all your labels in the sidebar of your blog, sorted alphabetically or by frequency of use.
Labels are handy if you blog about a lot of different subjects, since readers can then choose to view all of your posts on, say, dancing at once. Or politics, or knitting, or whatever you happen to be writing about. If you have a team blog, you could also give each member their own label, so you could easily read all the posts by any one of them. Feel free to come up with other creative new uses as well!
The following characters cannot be used in labels: &<>@!,
Enter your blog's web address in the "Ready to Burn?" form found on FeedBurner's homepage and at the bottom of the pages in the Blog and Podcast sections. If you plan to publish a podcast with your Blogger feed, check the "I am a podcaster" box. Click Next ».
The Identify Feed Source page should appear.
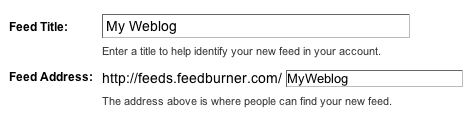
On "Welcome", make sure the title and FeedBurner address (URL) of your new feed are values you prefer.
The Create or Sign In To Your FeedBurner Account page should appear.
Also on this page, create a FeedBurner account by picking a username and password and supplying your email address.
When you've supplied all the required information on this page, click Activate Feed ». A "Congrats" page should appear.
Read all of the information on "Congrats", then click Next » to continue with the setup process.
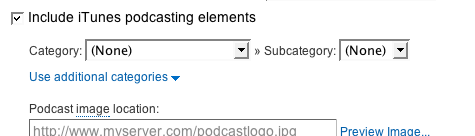
If you selected "I am a podcaster" on the homepage, configuration options for our SmartCast service will appear. Here you can supply categories and other information for iTunes, append a copyright message, and submit your podcast to Yahoo! Search.
When you are finished, click Next ». Configuration options for FeedBurner stats services should appear.
On the stats configuration page, select the level of feed stats detail you want.
Click Next » to finish the setup process and enter our feed management interface.
You're now ready to make your FeedBurner feed available on your Blogger site!
Tracking 100% of your feed traffic: Redirecting your Blogger feed to your FeedBurner feed
Blogger can make sure all feed traffic for your blog content goes to your FeedBurner feed. This ensures your FeedBurner stats are comprehensive and accurate; even subscribers to the 'Original Feed' are routed through FeedBurner. To redirect your feed:
From the Blogger Dashboard, click the Settings link for the blog you want to promote.
The Settings page for your selected blog should appear.
Click the Site Feed link under the Settings tab.
Type your complete FeedBurner feed address into the Post Feed Redirect URL text field. Make sure you type in your entire feed address including the "http://" portion.
Click Save Settings.
You should see the message "Settings were Saved Successfully".
Blogger will now redirect all feed traffic for your blog to your FeedBurner feed.
Note: If you are using the redirection feature within Blogger to send all of your feed traffic to your FeedBurner feed, you may want to modify the code we provide in order to keep your subscribers with you, even if you leave FeedBurner.
Is your blog is spam labelled , or is it not shown now a days ? .We found that many blogs are blocked as spams blog.Now blogger team are very strict in these area.Some of my friends seen that "Return to Blogger" error while they try to open their Blog.To solve this problem,
The import and export features on Blogger give your content a whole new range of portability and freedom, allowing you to create copies of your own blogs as well as import them into other existing ones. Best of all-we've made this a very simple process!
Import as a New Blog
To import content as a brand new blog, click Create a Blog from your dashboard.
Then under Advanced Options, click the Import Blog Tool
Finally, choose the Blogger export file (.xml) from your hard drive and fill out the word verification. Click the Upload arrow and your new bog will be created instantly!
Import Into an Existing Blog
To import posts and comments into an already existing blog, start by clicking Import Blog from the existing blog's Settings | Basic tab. Note: Your template will not be affected by the imported content.
Next, choose a Blogger export file (.xml) from your hard drive and fill out the word verification beneath. By default, all of your imported posts will remain unpublished until you publish them from your dashboard later. However, if you would rather have all posts published immediately, make sure to check the box next to Automatically publish all imported posts before you click Import Blog.
If you did not choose to have your posts publish automatically, you will need to manually publish them from the Posting | Edit Posts tab before they will appear on the web. You can either publish all the posts at once by clicking Publish all imported posts, or publish individual posts by selecting them and then clicking Publish Selected.
Exporting Your blog
To export your blog, simply click Export Blog from the Settings | Basic tab. Finally, click the Export Blog button. You blog will be stored as a Blogger export file (.xml) file which can be kept as a backup on your hard drive or imported into another blog.
Many bloggers needed their blog more graphically professional.To this idea,i added here another css script to create horizontal menu bar with drop down facility.Now create drop down menu bar within ten seconds!!. Last week i posted a horizontal menu bar code. You need just
Copy this code paste it to "HTML/SCRIPT" gadgets.
Then hit on save.
Done!!!
<style type="text/css">
/*Credits: Blogxool.blogspot.com */ /*URL: http://www.blogxool.blogspot.com */ .menu{ border:none; border:0px; margin:0px; padding:0px; font-family:verdana,geneva,arial,helvetica,sans-serif; font-size:14px; font-weight:bold; color:8e8e8e; } .menu ul{ background:url(http://www.cssmenumaker.com/menus/062/images/menu-bg.gif) top left repeat-x; height:43px; list-style:none; margin:0; padding:0; } .menu li{ float:left; padding:0px 8px 0px 8px; } .menu li a{ color:#666666; display:block; font-weight:bold; line-height:43px; padding:0px 25px; text-align:center; text-decoration:none; } .menu li a:hover{ color:#000000; text-decoration:none; } .menu li ul{ background:#e0e0e0; border-left:2px solid #f68618; border-right:2px solid #f68618; border-bottom:2px solid #f68618; display:none; height:auto; filter:alpha(opacity=95); opacity:0.95; position:absolute; width:225px; z-index:200; /*top:1em; /*left:0;*/ } .menu li:hover ul{ display:block; } .menu li li { display:block; float:none; padding:0px; width:225px; } .menu li ul a{ display:block; font-size:12px; font-style:normal; padding:0px 10px 0px 15px; text-align:left; } .menu li ul a:hover{ background:#949494; color:#000000; opacity:1.0; filter:alpha(opacity=100); } .menu p{ clear:left; } .menu #current{ background:url(http://www.cssmenumaker.com/menus/062/images/current-bg.gif) top left repeat-x; color:#ffffff; }
This sample contain only one model,If you want more models with more variety , Click here. This webseite contain all types of Menu bar that match with your Blog.
On the behalf of Blogger 10 anniversary,new updated post editor launched.Which helps you to make your post very easily without any more troubles.
To enable this New Updated Post editor.
Dashboard
Settings (Basic)
Select Updated Editor radio button (See the picture).
Then hit on 'save'.
-: An overview : -
Improved Image Handling
When you upload an image to the new post editor it will appear as a thumbnail in the image dialog box. That way, you can upload several images at once, and then add them into your post at your convenience. The thumbnails will be available until you close the post editor. When you add an image from the dialog into your post it will be placed at the insertion point instead of at the top of the post. If you don’t like where an image is in your post, you can drag it around to another spot. If you drag it towards the left side of the editor it will float to the left, likewise for the right, and if you leave it in the center it will be centered. You can drag the image between paragraphs and other block elements. Unlike in the current editor, dragging in the new editor preserves the link to the full-size version of the image. You can easily resize or remove an image with the image size “bubble.” Click on the image (Firefox 3 users may need to double-click) to bring up the bubble, and resize the image instantly. You can resize any image, including ones added by URL, but if you resize an image that was uploaded through the post editor we resample the image on our servers to keep the download size small.
Improved Raw HTML
If you use Edit HTML, especially to add tables and other advanced HTML to your posts, you should find that the new editor has a number of enhancements to make the experience less frustrating, or, dare we say it, even pleasant. By default, the current post editor replaces any newlines in your post with tags. This can cause problems when you want to use newlines to make table or list HTML clearer, since the inserted s will mangle the formatting significantly. The new post editor does not introduce s within tables, lists, scripts, styles, preformatted blocks, or objects. Since they won’t destroy the formatting, the new post editor adds clarity newlines to the HTML that’s generated by Compose mode. For example, if you create a list in Compose mode and then look at it in Edit HTML, you’ll see that there are newlines before each of the <li> tags. For posts made with the new editor, the blog-level “Convert line breaks” setting (from Settings | Formatting) is ignored. Instead, newline behavior is controlled by an Edit HTML setting under “Post Options,” which affects how newlines and tags are displayed in the Edit HTML editor. This means that, unlike “Convert line breaks,” you can change newline behavior when it would be useful for a given post without affecting the display of all the other posts on your blog. We’ve also added a Compose mode setting to let you choose what happens when HTML tags are typed in to the Compose editor. The default, “Interpret typed HTML,” matches the current post editor’s behavior: typing “bold” into the editor would look like this in your post: bold. If you change the setting to “Show HTML literally” instead, you’ll get: bold. The Edit HTML and Compose settings, along with the choice of whether to show Edit HTML or Compose by default, are saved per-user, per-blog and are updated when you save a post. The Edit HTML setting defaults to the value of the blog’s “Convert line breaks” the first time you open the new editor.
Other New Features
Add your location to your posts with geotagging
Posts are now timestamped at the date and time they are published, not when they were orignally created.
Vertical resizing. You can now change the height of the post editor by dragging the resize handle in the lower right (near the labels field). The size is saved in a per-user, per-blog preference.
Easy link editing in Compose mode. Just click a link and you’ll have the option of changing its URL or removing the link
Full Safari 3 support on both Windows and Macintosh. The old editor is pretty quirky on these browsers, but the new editor works as you’d expect.
New Preview dialog that shows your post in a width and font size approximating what you’d see on a blog.
where the URL is that of the background music you wish to use. This method works perfectly well, but visitors to your site will not be able to switch the music off if it becomes distracting.
So instead, you may prefer to use this method instead, which is compatible with all browsers (press the play icon to start music):This is achieved by including the following code somewhere in your template (eg: the sidebar):
You can change some of the variables to suit your needs:
autostart: set to "true" to make the music begin as soon as the page is loaded, or "false" to ensure the user has to press the play icon
loop: set to "true" to have the music play over and over, or "false" so that it plays only once.
height: if this is set to "40", only the play options will be visible. You can make this larger if you prefer, in which case blank space will be visible.
Using either method, you can link to .mp3, .mid or .wav music files. However, you must be aware of copyright restrictions, and ensure you have the appropriate permission for use for the music you decide to use!
Here are some sites I've used for copyright-free music you could use in your blog:
Blogger offer an 'Undelete option' to delete a blog,what will do if your post has been deleted ? If you accidentally deleted a post, how can you try to recover (undelete) the deleted post? I have three different ideas, one of them depends on the cooperation of a helper plus a good memory or clever guesswork.
METHOD 1
This method is applicable if you are still working on the same computer where you had prepared the post (or had viewed the deleted post). Just press ctrl+H (Cmd+H on MAC OS) to open a sidebar listing the browser history. Go to the part where you were editing the post and continue to edit or publish the post (or copy-paste from the cached copy of the displayed post):
Alternative keyboard shortcut to call up the browser is shift+ctrl+H (shift+Cmd+H for MAC OS).
METHOD 2
This method is applicable if you had not closed the tab or window where you had been preparing the deleted post (or had viewed the deleted post). Just keep pressing the BACK button till you get back to the point where you were editing the post (or had viewed the post).
METHOD 3
Try to find a cached copy of the deleted post on the Web and restore the post from the cached copy. Type in
cache:URL
to try to find cached copies on the net.
METHOD 4
This is applicable even if you have no access to the computer where you had edited or viewed the deleted post, but you must have the URL (permalink) of the deleted post. If you don't have the URL, then you can try to guess the URL from the post title.
For example, the title of this post is "Recover accidentally deleted post". Now I haven't published the post yet, but I can guess that this post URL will be:
Now remove blogger fevicon and add your style fevion for your Blog. It makes a real nice touch for your Blog. Example for Fevicon. Now you too can Create a Fevicon for your blog,by removing the current blogger fevicon.
How to add ?
Simply upload the file, favicon.ico to the blog or other free uploading websites and get the Link. Make sure your favicon file is named “favicon.ico.” When someone bookmarks your site with a browser that supports favicons, your favicon will appear. Alternatively, you can use this code between the <head></head> (x)HTML tags:
Some browsers will look for a direct link in the HTML source code to your site's favicon.ico file. You can help these browsers by adding this link in the head section of each page on which you want the Favicon.ico to appear. Here is the link code to include: <link rel="Shortcut Icon" href="/favicon.ico"> Once you've added this code, upload all of your modified pages.
(Some people suggest that the following is actually more correct: <link rel="icon" href="/favicon.ico" type="image/x-icon"> You can use both if you want!)
If you want to use a GIF or PNG instead, use this format instead (just remember that it won’t work in IE):
<link rel="icon" href="/favicon.png" type="image/png"> or






 When you click this icon, you'll get a window that allows you to select an image or multiple images from your computer.
 If you click the link to choose a layout, you can customize the way your images will appear in your post:
 The left, center and right options determine how the text of your post flows around the pictures.




 Finally, click the Export Blog button. You blog will be stored as a Blogger export file (.xml) file which can be kept as a backup on your hard drive or imported into another blog.

 You can easily resize or remove an image with the image size “bubble.” Click on the image (Firefox 3 users may need to double-click) to bring up the bubble, and resize the image instantly. You can resize any image, including ones added by URL, but if you resize an image that was uploaded through the post editor we resample the image on our servers to keep the download size small.
 For posts made with the new editor, the blog-level “Convert line breaks” setting (from Settings | Formatting) is ignored. Instead, newline behavior is controlled by an Edit HTML setting under “Post Options,” which affects how newlines and
 We’ve also added a Compose mode setting to let you choose what happens when HTML tags are typed in to the Compose editor. The default, “Interpret typed HTML,” matches the current post editor’s behavior: typing “bold” into the editor would look like this in your post: bold. If you change the setting to “Show HTML literally” instead, you’ll get: bold.
