Blogger Templates : Web Blog
 |
|


How to Index your blog into google Search engine
 Many bloggers have no idea about how to make appear their blog in search engines,they use many keywords ,sending mails and messages to buddies,i prefer another method.Of course this keyword make a good result in search engines, but without indexing , what is the use of it ? Remember if you have good content in your post and you wish to Read many friends,then index your blog into search engines.Especially GOOGLE which have billions of users.
Please Read this Post before indexing your blog.
After Just Click here to Add URL of your blog directly into GOOGLE search Engine.
Google can't make ay predictions or guarantees about when or if they will appear.You should Add Full URL ,including http:// as prefix, For example http:://www.blogknol.blogspot.com
You add comments about your site,If your website/blog is related about mobile then you can add keywords of mobile of your site as comments.
Recover your hidden blog
As in my olod post i told about to hide your blog, now get know hot to recover to old position.
Thanks.
- Go to Dashboard,where blog name displays
- Click on "Show all" button at the bottom of blog names.

- Now click on "Always show along the blog name.

- Now refresh your dashboard,now you can see the hided blog in dashboard.
Thanks.
How to hide your blog

Don't misunderstand the head,i just says to hide your blog from dashboard.Yes within one step you can hide your blog from dashboard,and thus you can just play with friends who share his blog to you.That is just simple,and don't worry you can recover this hided blog.
- Go to Dashboard where your blog name displays.
- Click on "Hide" along with blog name.

- Finished.
How to add related post widget
 A days before i added a new gadget in this blog,you can see this at the bottom of this post which shows all related post.Today i just showing you how done this, this will help you in your blog.Just see this its quite simple.
- Login to Blogger account.
- Then go to Settings, EDIT HTML, and click on "Expand Widget templates" .

- Go to ( < head > ) and paste the code below as instruction in the below image .

- Copy the code below,
- Now just paste the below code after the red colored data
(data.post.body)

- Code::
- Save the Template.And check the result.!!
3 column templates
Today i am shiowing some of my best 3 column blogs,which will help you very much,i suggest ,if you have more content and more gadgets,then better use 3 column templates,otherwise use 2 column templates.To apply this template as usually, go to Dashboard , Layout , EDIT HTML and browse for the template ,and upload it and click on save button.

iTech Blog v2 - Download

Movies Template - Download

 Revolution Church Theme - Download
Elegant Style Template - Download
Dark Tide, The

iTech Blog v2 - Download

Movies Template - Download

 Revolution Church Theme - Download
 Elegant Style Template - Download
Dark Tide, The
How to Change order of blog post
To some one , someposts are very important which they posted years back,and wish to come back the post into to top of the archive.Actually is it possible to bring the old post into to top of blog post?Yes.It is very simple to do.Just follow me friends,
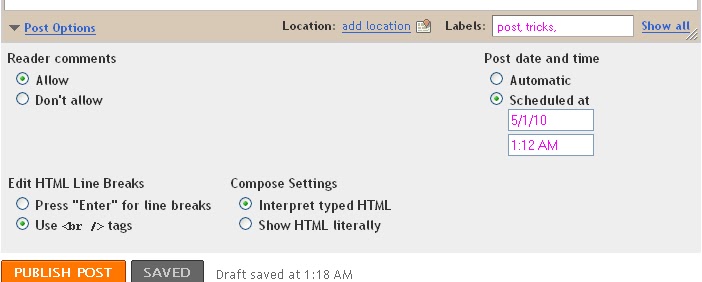
- Go to Dashboard,Edit Post,Click on "Edit Post" .
- At the Bottom of your Post editor, Click on "Post Options" as shown in the image.
- In some Editor,

- Now change the Post Date into current date to bring your old post into top.
- Save the Post. Finished.!!!
Buy a custom domain through Blogger
 If you wish to shorten your blog address (URL ) or want to buy a domain name for your blog,then you don't need to go any where, unless you have blogger account.You can Buy a custom domain at low price.Only 10$ per year needed to buy a domain name for your blog.
I will tell more details along with steps below, Check the Steps to Buy this domain through blogger.
- Login to Blogger.com,Go to Settings,Publishing Tab.
- Just select the Custom Domain option, enter the domain name you'd like and click Check
Availability.
- After that you will take to Google Apps domain purchase website , and proceed with the registration . Finally, you'll go to Google Checkout where you'll make your payment. Your domain is registered with one of our registration partners, either eNom or GoDaddy.
- Soon,You'll get a domain registration confirmation email from Google Apps.
- Clicking the link in this email allows you to sign this domain up for an Apps account. Google Checkout will also send you an email with the order receipt.
- You will be waiting for 1 or 2 days to get the domain name.After that your blog automatically redirect into your new domain.
Video Tutorial
Upload Imges to Picasa Web Album
 Some times, you might feel error while you uploading image into your blogger post.It might because of your browser or internet connection.At this time you can picasa web.I feel quite easy with this, you can upload about 100 pics to an album and more you can create many albums as you wish.
But Picasa provides only 1 GB space , but you can upgrade this storage into your wish by paid.
Follow the method to Upload images to Picasa.
- Go to Picasa Home page , and Login into your account.
- Now click on Upload Button .

- Now Select an Album ,then Browse Image from files and Click on Upload Button.
Now wait for a while ,the images got uploaded.
- Automatically images will Uploaded to your account.
Insert Picasa image to blog
- Now Select the Image you should needed to add to blog post .
- Just Move cursor and click on right button,and select " Copy Image"
- Now Go to Post editor and Select Compose mode and Right click on post editor and paste the image.
- Image will be shown at the post editor.
- Save the Post.
Add Google Adsense From Layout of Blog
When you goes to Adsense account and get adsense from the website, you might get som codes to apply in your blog.I think its might be make some difficulties to configure the adsense,But there is a easy method in your blog itself.Please follow the steps that i have done below.


Thanks,
- Go to Dashboard by Login into blogger.com

- Then Go to Layout
>> Page Elements

- Click on "Add Page element and Select "Adsense" from the list.
- If your adsense already accepted, then configure your adsense,according to your preference, which suites to your blog.
- Now save the Gadgets ,automatically change will applied to your blog.
Thanks,
Remove Subscribe to:posts(Atom)
Do you feel " Subscribe to:posts(Atom) " is boring under your post ?
Now this post will show you how to remove it from your blog and it creates clean look for your blog.
Follow the Step :
- Go to dashboard/ template/ edit HTML.
- Click the 'Expand
Widgets Templates' box

- Find:
Remove this line:
That should remove Posts (Atom).
Create a Table in your blog
Want to tabulate a list in your Blog ?How would you List it ? You need to know html language for create a table in blog.But it is quite risky for you.
Now onwards you can create a table within seconds of time.
Follow the step :
Some Additional Notes :
Now onwards you can create a table within seconds of time.
Follow the step :
- Go to Quackit .com Or htmlbasix.com
- Copy the Generated code from the website (Quackit or Basix )
- Paste this code in your Post . Note : Post Editor Must be in HTML mode.
- Publish your Post.
Some Additional Notes :

Iframe to add another blog into your blogger page
 Do you ever dream to display another blog in your blog ,as one blog. This technic is called Website merging.Iframe helps to do it.You can put an IFrame in
 either a blog post, or in a special page element. It's a dynamic window; when
you change something in the blog contained in the window, the contents of the
window changes too. Just refresh, and you can see the change.
- This is the syntax to do it.Please see this Post , where i merged Google groups into a post.
For this i used this Code.
- You can adjust this code according to your post area width and size.
- To merge another blog,you should get the URL of desired website and replace in the http://groups.google.com/group/blogknol in the code that i give above.
Create a Scroll Bar Using CSS in Blog
To create a Scroll bar in your Blog,You should follow the steps,
- Go To Layout and Click on Add Gadget

Recover Deleted Google Account
 Once you deleted your Google account,automatically the accounts associated with Google will be deleted,especially Blogger account.It is not rare to hear a Blogger screaming for help after he deleted his Google account for that deletion will affect the Blogger account.
 Therefore,Immedietly report to Google Contact Form.( Click here ) . There is a window of about a week to appeal, after which the Google Account will be permanently deleted.
Insert a Custom Signature in Blogger Posts
- Go to your Blogger Dashboard then Settings

- Go to
Formatting then Scroll down to the Post Template box.

- Insert this code into the box:
- Copy the url of your image and paste it into the code where you see
the words "signature URL".
For Example :

- Now, Save settings
New Blogger Template Designer
Its a Good news for All blogger s,Blogger announced that
the Blogger Template
Designer has launched to Blogger
in Draft, . The Template Designer brings a new level of
customization to your blog. Now you can easily edit the background,layout and other without using "edit html" ,That means an Low level blogger can design his blog fantastically.Take a look to know more:
In the Template Designer, you’ll find:
- 15
new professional templates to start from (and more on their way) - Custom blog layouts with one, two and three columns
- Hundreds of professional background images from iStockphoto
- Customizable colors, fonts, and more!
We have more details and tips in our Blogger Template Designer post on
the Blogger in Draft blog.

We worked with iStockphoto, the
leading microstock image marketplace, to put together a great collection
of beautiful images and patterns to use as backgrounds on your blogs.
The photos are stunning, and are free to use on your Blogger blog.
That being said, today’s launch is just the beginning. We’ll add more of
our own designs over the coming weeks and months and, through the new Template
Design Group, we’ll be working with members of the Blogger design
community to bring their templates into the new Template Designer.

Help test drive the Blogger Template Designer by logging into Blogger In Draft, and learn more
about the new features in more detail on the Blogger In Draft blog.
Subscribe to:
Posts (Atom)